Letting the user login with the option ‘Login with Facebook’ is the perfectly familiar way to provide authentication. It not only allows you to attach social media characteristics into your app, but it can also be used as a login system instead of creating the custom login.
This feature is natively supported since the introduction of iOS 6, still, it is necessary to add the Facebook SDK from our end of the project. The Facebook SDK in Swift will enable the user to sign into your app with Facebook Login credentials. When they ‘log in’ to your app using Facebook they can grant permissions to your app so that you can retrieve information or perform actions on the Facebook platform on their behalf. In this tutorial, we are going to see how you can add ‘Facebook Login’ into your iOS Swift project.
Step 1: Install Facebook SDK
To add Facebook SDK into the app add the following steps.
- Make sure you are running the latest version of CocoaPods
- Add the following lines to your Podfile:

- Run pod install and you’re all set!
Note:- You can refer second video for ‘pod’ installation process in detail.
Now Compile and Run your project. If it was implemented correctly, you are able to import FBSDKCoreKit, FBSDKLoginKit, FBSDKShareKit in your Login Controller.
Step 2: Add the following code in your AppDelegate’s “didFinishLaunchingWithOptions” method

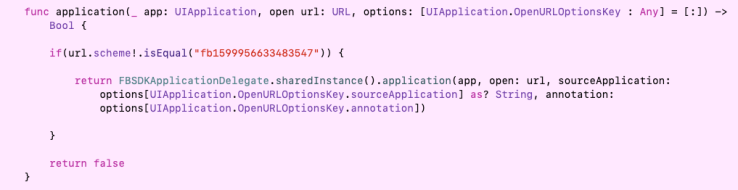
Step 3: Add the following code in your AppDelegate file

Note:- Above method is going to get deprecated in near future. It is advisable to use below method for your new projects.
Step 4: Create FacebookSignInManager.swift file in your project and add the following code in that
import UIKit
import FBSDKCoreKit
import FBSDKLoginKit
import FBSDKShareKit
class FacebookSignInManager: NSObject {
typealias LoginCompletionBlock = (Dictionary<String, AnyObject>?, NSError?) -> Void
//MARK:- Public functions
class func basicInfoWithCompletionHandler(_ fromViewController:AnyObject, onCompletion: @escaping LoginCompletionBlock) -> Void {
//Check internet connection if no internet connection then return
self.getBaicInfoWithCompletionHandler(fromViewController) { (dataDictionary:Dictionary<String, AnyObject>?, error: NSError?) -> Void in
onCompletion(dataDictionary, error)
}
}
class func logoutFromFacebook() {
FBSDKLoginManager().logOut()
FBSDKAccessToken.setCurrent(nil)
FBSDKProfile.setCurrent(nil)
}
//MARK:- Private functions
class fileprivate func getBaicInfoWithCompletionHandler(_ fromViewController:AnyObject, onCompletion: @escaping LoginCompletionBlock) -> Void {
let permissionDictionary = [
“fields” : “id,name,first_name,last_name,gender,email,birthday,picture.type(large)”,
//”locale” : “en_US”
]
if FBSDKAccessToken.current() != nil {
FBSDKGraphRequest(graphPath: “/me”, parameters: permissionDictionary)
.start(completionHandler: { (connection, result, error) in
if error == nil {
onCompletion(result as? Dictionary<String, AnyObject>, nil)
} else {
onCompletion(nil, error as NSError?)
}
})
} else {
FBSDKLoginManager().logIn(withReadPermissions: [“public_profile”, “email”], from: fromViewController as? UIViewController, handler: { (result, error) -> Void in
if error != nil {
FBSDKLoginManager().logOut()
if let error = error as NSError? {
let errorDetails = [NSLocalizedDescriptionKey : “Processing Error. Please try again!”]
let customError = NSError(domain: “Error!”, code: error.code, userInfo: errorDetails)
onCompletion(nil, customError)
} else {
onCompletion(nil, error as NSError?)
}
} else if (result?.isCancelled)! {
FBSDKLoginManager().logOut()
let errorDetails = [NSLocalizedDescriptionKey : “Request cancelled!”]
let customError = NSError(domain: “Request cancelled!”, code: 1001, userInfo: errorDetails)
onCompletion(nil, customError)
} else {
let pictureRequest = FBSDKGraphRequest(graphPath: “me”, parameters: permissionDictionary)
let _ = pictureRequest?.start(completionHandler: {
(connection, result, error) -> Void in
if error == nil {
onCompletion(result as? Dictionary<String, AnyObject>, nil)
} else {
onCompletion(nil, error as NSError?)
}
})
}
})
}
}
}
Step 5: Add the following code in the action method of Custom action button

We can retrieve the user info from the “responseDictionary”
Wrapping up:
That’s it for today. As you have learned, using swift is pretty straightforward. Also, not too difficult to implement. Addition of Swift functionality to your project is a great way to get started with this amazing programming language.
Apart from our core commercial development projects, the team at Kunsh Technologies – iOS App Development Company is obsessed with learning about new technologies. We post about learning development, step-by-step guides, tutorials, as well as important announcements to help keep you up-to-date.
